Using virtual machines can sometimes be a must for anyone working on important IT projects. Almost any operating system can be installed as a virtual machine. Being able to throw anything at a system and then revert back to a previous point all while documenting the results is a powerful thing to have. System admins can test system configurations and settings. Software developers can write and test code or websites with without modifying their main PC. Network engineers can setup complete simulated network systemw before implementing them in production. Security pros can setup mock networks, attack them, document the logs and IOCs, then create firewall and IDS rules against what they learn. I do the latter and my job wouldn't be possible in today's IT age without complex virtual machines and virtual networks. This is a guide on how to install desktop Ubuntu in Windows 10 with VirtualBox and do it on a PC with inferior resources. I will be using 18.04 64 bit Lubuntu flavor of Debian/Ubuntu because I have been using the Lubuntu operating system for years and it just plain works better for getting the job done faster and consistently, in my opinon. This is useful for almost anyone in the IT field. Once you setup a virtual machine with this guide I will also show you how to set restore points, clone, and export the full machine so to save time by not having to rebuild another VM later on.
Lets begin.
The first step is to download Virtualbox:

Then install:

Keep default settings then click next to install:

Next we need to download our actual Lubuntu 18.04 operating system image file which will be an iso file at Lubuntu:

Now lets start up Virtualbox. Virtualbox should have created a desktop icon, so run that and click "Machine" > " New" to start creating a new virtual machine:

Name your virtual machine what you want, usually a name that depicts what you will be using it for is good. Select the settings as shown below, Linux, Debian 64 bit, then click next:

Select at least 1gig of memory, or more if you want. A good rule is no more than 1/3 of the memory your host/physical PC has:

Create a virtual hard drive:

Select "VDI":

Select "Fixed Size":

Select at least 10 gig for hard drive size. Like the memory rule, don't select too much as not to take up your host/physical PCs hard drive space:

Click "Create" and wait till that is done, it may take a few minutes:

After installing the Lubuntu image file is finished we will configure it as follows:

In settings go to "Storage" > then click the little disk that says empty > then click the little disk next to IDE Secondary Master and choose "Virtual Optical Disk":

Select the Lubuntu iso file from whatever folder you downloaded it to earlier:

Next we will enable folder sharing so we can access the same folder from your host/physical PC or from inside your virtual machine:

Select the folder that resides on your host/physical PC to share with your virtual machine:

Select the following settings then click "Ok":

At the bottom of the settings dialog click "Ok" to save and exit settings window, then start up the virtual machine by clicking the big green "Start" arrow:

It may take a few mins for your virtual machine to load for the first time, when it finishes you should see the following screens, make the following selections to progress through the install. Select your language:

Click "Install", this can take a few minutes:

Next you should see the Welcome screen, select your preferred language again then click continue:

Select the settings as follows:

Select "Erase the entire disk(this is the Virtual Disk Drive you created earlier)", then click "Install Now":

Finalize setup and click "Continue", this will take a moment:

Self explaining setting:

Enter a user name, what you want to name your virtual machine, passwords:

Etc, etc:

Ho hum almost done:

After this finishes, it will ask you to reboot, after clicking reboot it will ask you to press enter one more time then it will restart:

Your virtual machine will reboot, then ask you to log in just like Windows usually does, enter your password you set earlier:

This is what your desktop will look like, somewhat similar to Windows. Menu on the bottom left, folder explorer and web browser icon. networking status and time/date on the bottom right:

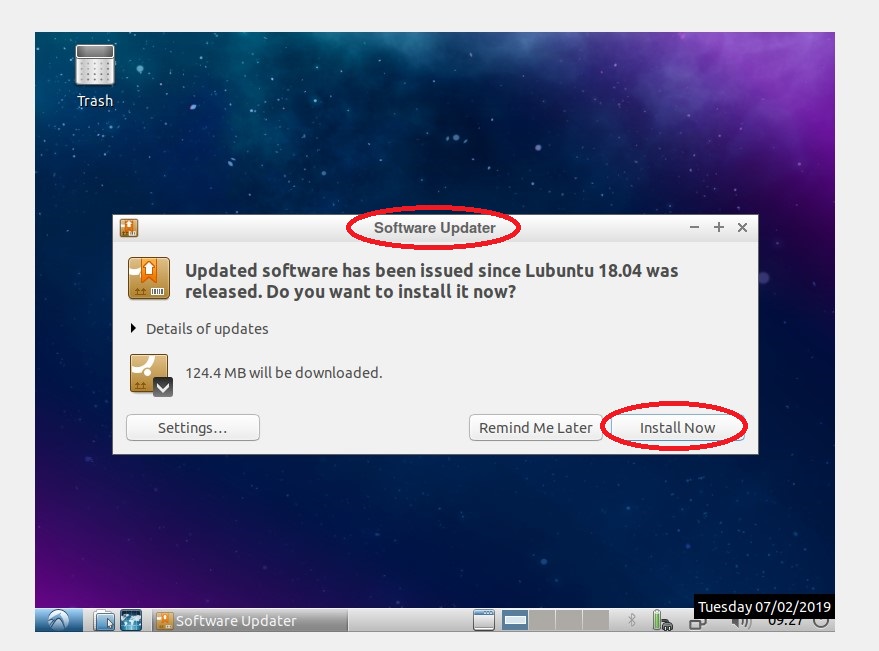
Sometimes the auto update will pop up quickly after booting, if it does click install now and enter your password and let it update then reboot. If auto update doesn't start up don't worry we will do it later:
After rebooting click the main menu button at the far bottom left, then click "System Tools" > then LXTerminal, as follows:

Type the following in the terminal:
sudo apt update
It will ask for your password so type that then press enter:

After updating at the command line finishes type this into your terminal:
sudo apt upgrade
press enter:

Almost finished, now look at the top menu of your virtual machine, click "Devices" > then "Insert Guest Additions":

That will open a dialog, click "Open in File Manager" then select "Ok":

Now go back to your terminal and find VBoxLinuxAdditions.run file(hint - when navigating the terminal for folders you can use tab completion to display all the folders from your current directory/this makes it easy to find files or folders with long names so you don't have to type it out). The file you need to run will be under a user directory which you named earlier in the installation. Here my user is named lubu. You will be looking for the directory /media/[user name]/VBox_GAs_[version number]/. If all else fails follow the image below:

Once you are in the correct folder type the following command and press enter:
sudo ./VboxLinuxAdditions.run
again you can use tab-completion to help find your file:

Now for the pièce de résistance, type in the command and press enter(make sure you get this right, user permissions is another guide all together):

Now logout and shutdown so you can create a restore point and export the vm as an OVA image so you never have to go through this again, well almost never!

Once your virtual machine is powered off do the folllowing. Open VirtualBox if it isn't already, select your virtual machine on the left, then click "Take" icon on the top menu, name your restore point something usefull then click "Ok" to save as follows:

Remember to make a restore point anytime you make a drastic change or setting to your virtual machine, for example big updates or installing software.
Now lets export to an OVA file so you can import your vm to other physical PCs and have an acutall file backup. In the top VirtualBox menu click "File" > "Export Appliance". This can take a few moments:

You can also clone your virtual machine which is exactly what it sounds like, makes a second mirror image, very useful for when you need to create a virtual network of machines or backup all your restore points. Here is an example of how to do such:

The following explains what and how virtual machine clones work:

Remember while it may take time to initially build a virtual machine, in the long run time it can save an infinite amount of time when you use restore points, clones, and exported appliances/OVAs properly.
Thank you for reading, I will be posting more about virtual machines/networks and security in general! I hope you find some of this usefull!
Comments
Post a Comment